Organisations can receive a promise to make a payment or a series of payments at a later date, often referred to as a pledge. Pledges are recorded in vega against individual contacts and can have a number of payments added to pay off the pledge over a period of time. This functionality can commonly be used for corporate or major donors who may pledge to make a large payment over a number of installments.
Pledges can be also be added onto a contact and paid off or partly paid by other contacts. This functionality can be used when an organisation pledges a donation amount that might then be paid by different branches.
Adding a pledge
Find the contact you are adding the pledge to and click 'Add Payment' from the top action buttons:
 |
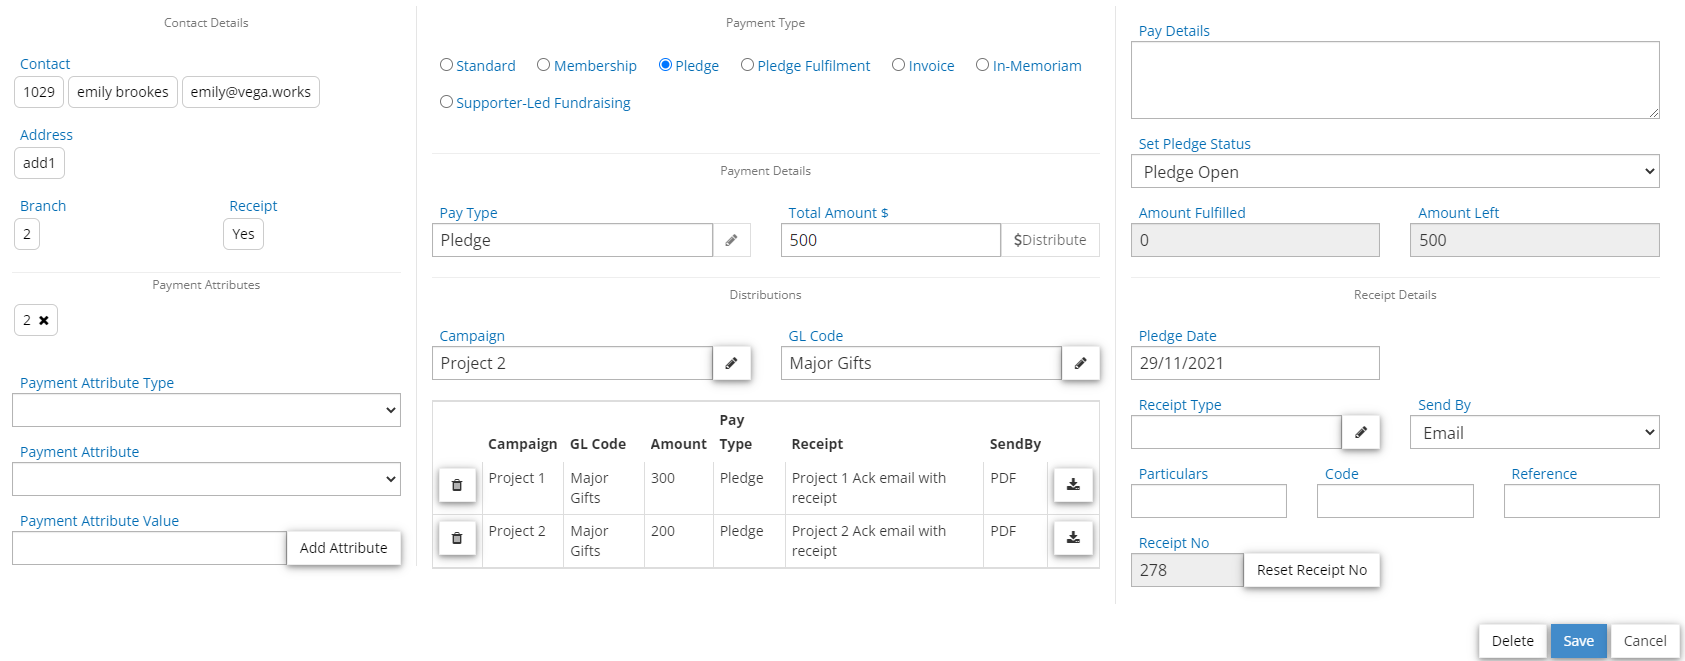
This will open the payment form (below is showing available fields once the Pledge payment type has been selected) :
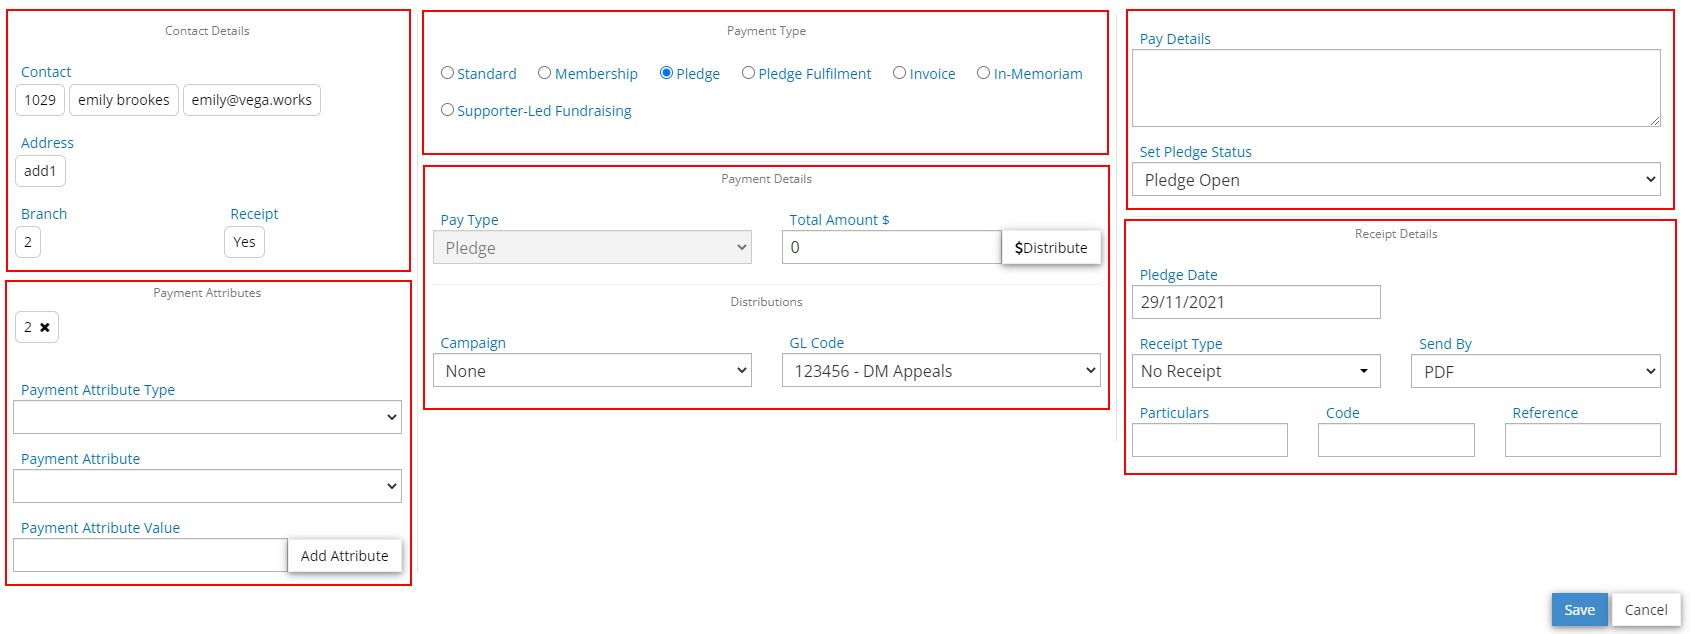 |
You will notice the payment form is divided into sections, as described below.
Contact Details
On the left-hand side, you will see important Contact Details, when these exist on the contact:
- Vega ID, Account Name, Email
- Home phone, work phone, mobile
- Address
- Membership
- Contact Branch, receipt option
- Key Attributes (if you have this turned on in your financial settings)
- Alert (if you have this turned on in your financial settings)
Payment Attributes
On the left-hand side at the bottom will be any Payment Attributes. You will automatically have the Contact Branch added here and drop-down lists to add any other applicable payment attributes and assign a value to these.
The middle section of this form is where the payment information is added:
Payment Type
There are six payment types available but for this purpose, we will be using Pledge as the payment type.
For detail on the other payment types please see detail below:
- Standard: This is the default option for one-off payments. No further information is required.
- Membership: This option is available if memberships have been set up in vega. It allows for membership payments to be processed by selecting the membership type.
- Pledge: We are using this now to record a pledge or promise to make a payment.
- Pledge Fulfilment: This is the payment option used to record a payment against a pledge.
- Invoice: Like pledges, invoices are not recorded as payments until the invoice has been paid but this does allow you to record that an invoice has been issued.
- In-Memorium: This allows for payments to be recorded in memory of another individual within vega. Details of in memoriam payments can be included in documents through the use of merge tags.
- Supporter-led Fundraising: This option will allow a payment to be recorded as fundraised by another contact in vega and will also show on their payments.
Payment Details
- Pay Type- When we selected pledge as the payment type this automatically updates the pay type to pledge also and this field is no longer able to be edited.
- Total Amount- Add the total amount being pledged.
Distributions
This is where you have the option to split your total pledged amount into different distributions to allocate funds to different campaigns and/or GL codes and issue a different document for each one. This can be used when a pledge is to be split between different projects, fundraising for different items, etc.
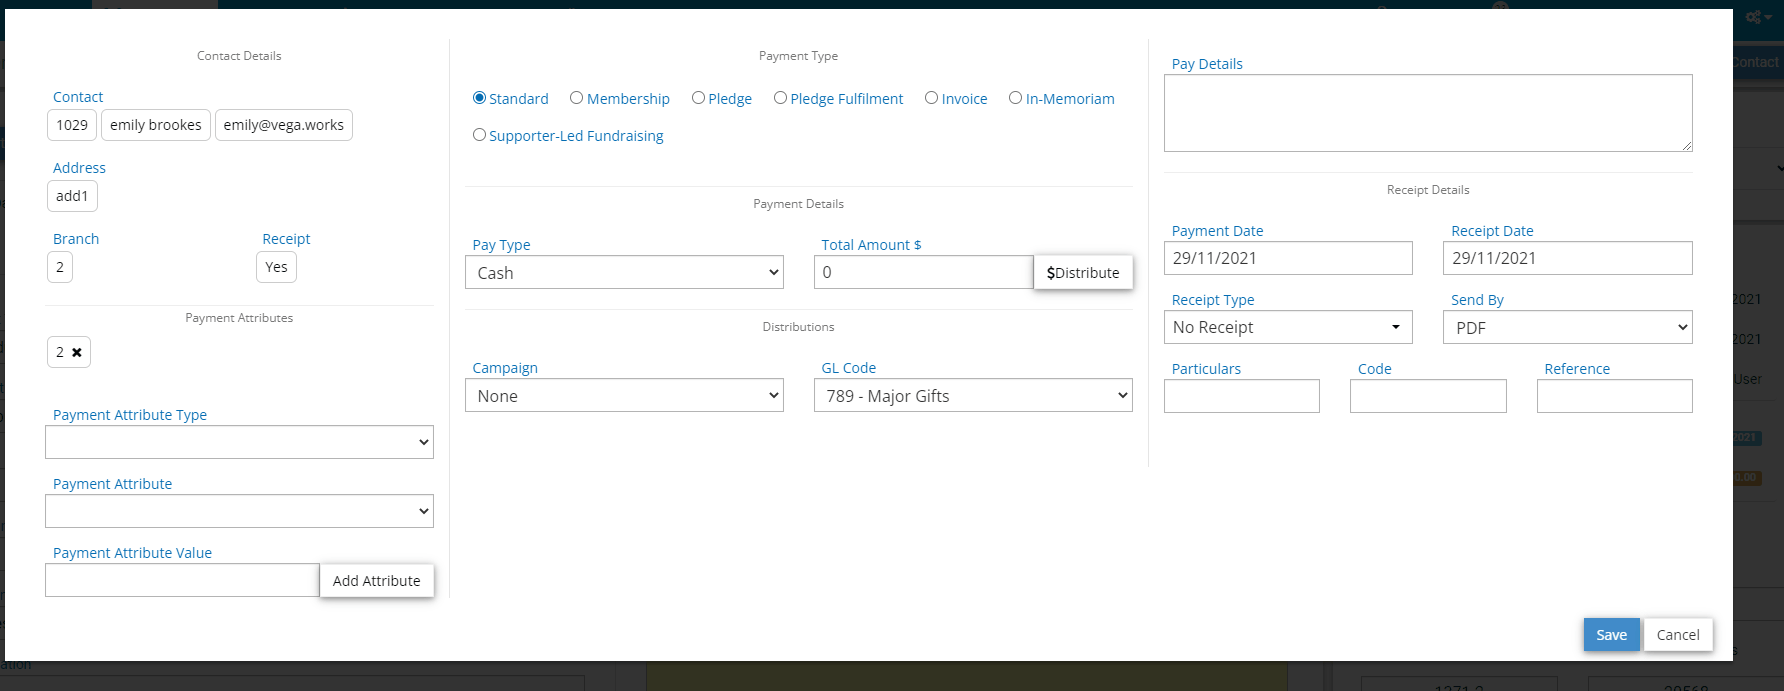
Adding a single distribution
If you are adding a pledge to be allocated with the same financial and receipting details for the full amount then you can simply select the relevant Campaign and GL Code, choose your receipt settings on the right-hand side and click Save.
The document selected as the receipt type will be automatically selected when the pledge fulfillment is added for this pledge. The receipt document can be used to issue an acknowledgment of the pledge or to set the document to be used in response to the pledge being paid.
 |
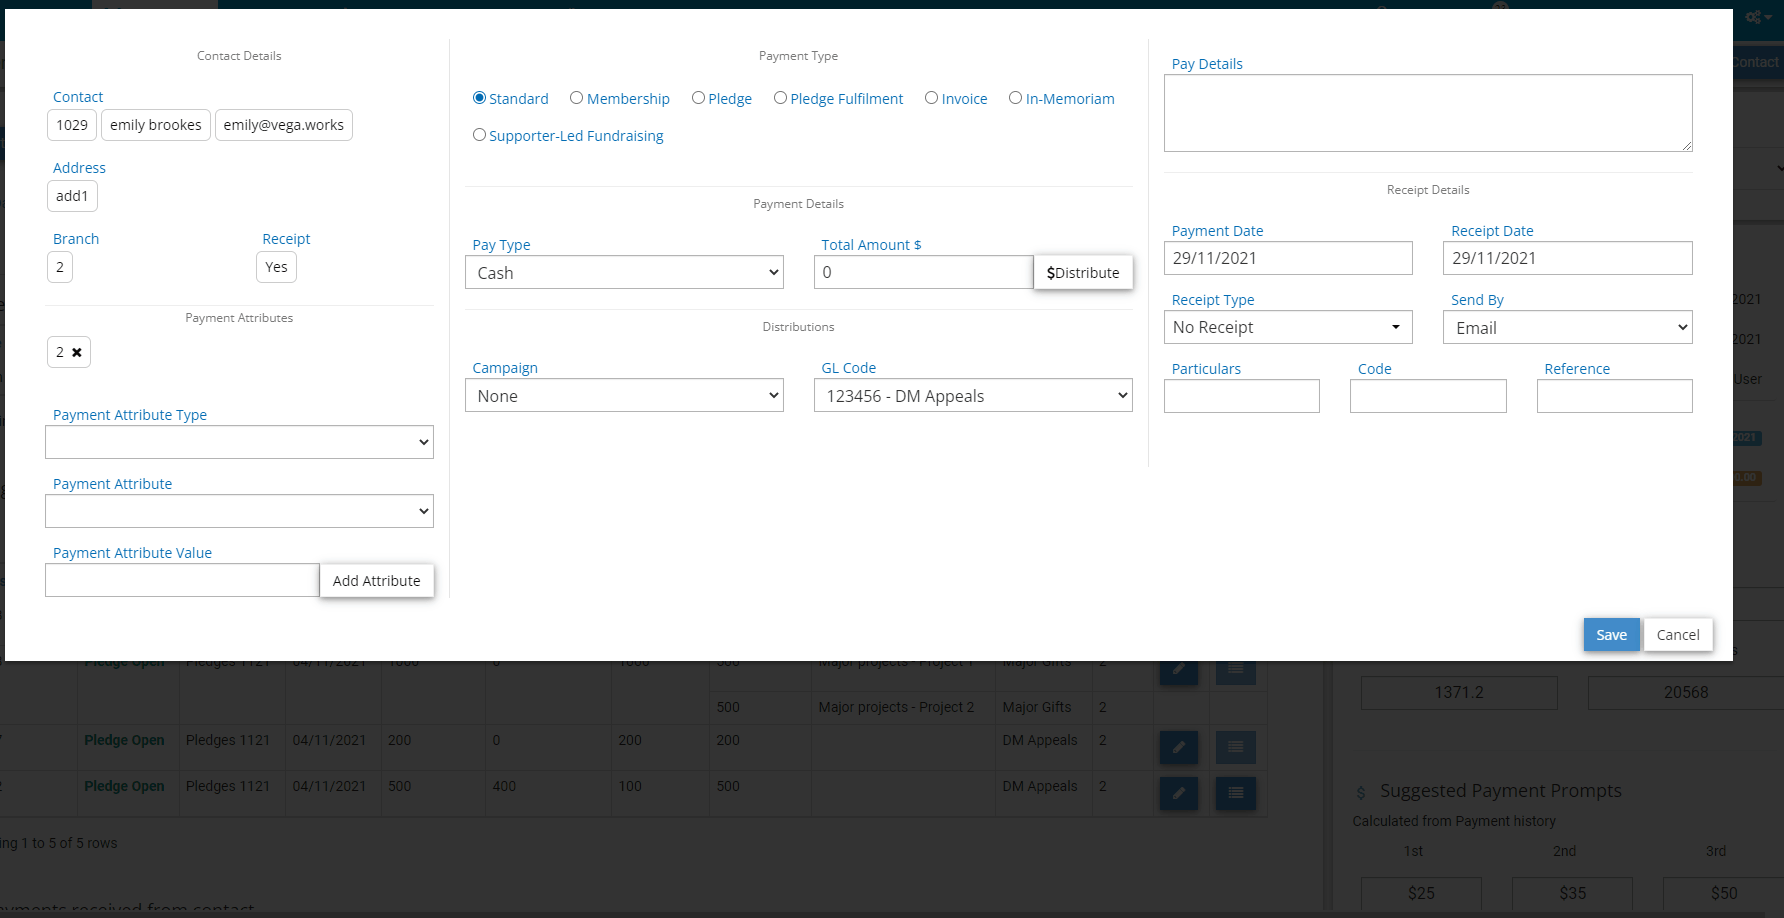
Adding multiple distributions
Alternatively, you can divide your total payment into multiple distributions. As an example, this can be used to record one pledge from a major donor that will be split between two projects.
When distributing your pledge the receipt settings can be set for each individual distribution and merge tags used in these documents will be populated from each distribution detail. The receipt settings on the right-hand side can still be used if one document is wanted for the total pledge amount.
The documents selected as the receipt will be automatically selected when the pledge fulfillment is added for this pledge distribution. The receipt document can be used to issue an acknowledgment of the pledge or to set the document to be used in response to the pledge being paid.
A pledge with multiple distributions will still be created with the same transaction ID.
Please see the recording below for how you can add multiple distributions to your pledge:
 |
On the top right-hand side, we can record a note or comment related to the transaction in the Pay Details.
Underneath this, we can see the Pledge Status. This will automatically be set as Pledge Open as we are creating the pledged payment but not recording the payment itself.
Receipt Details
The receipt details here will create a PDF download or email a document for the total pledge details. You will need to first save your pledge and then re-open it to download or send the receipt document.
- Pledge Date- The date the pledge is made.
- Receipt Type- This is the document to be issued in acknowledgment of the total pledged amount or to be issued after payment of the total pledge amount. The documents displayed in this dropdown can be customised in your Admin settings.
- Send By- This is the method used to send the receipt for the total payment:
- PDF: This is used to send a printed receipt and shows the option to Download Receipt, this will generate it as a PDF file.
- Email: This is used to automatically send the document via email to the preferred email address on the contact dashboard.
- Particulars- Additional information on the payment.
- Code- Additional information on the payment.
- Reference- Additional information on the payment.
Click Save when you are happy that all information entered is correct for this pledge.
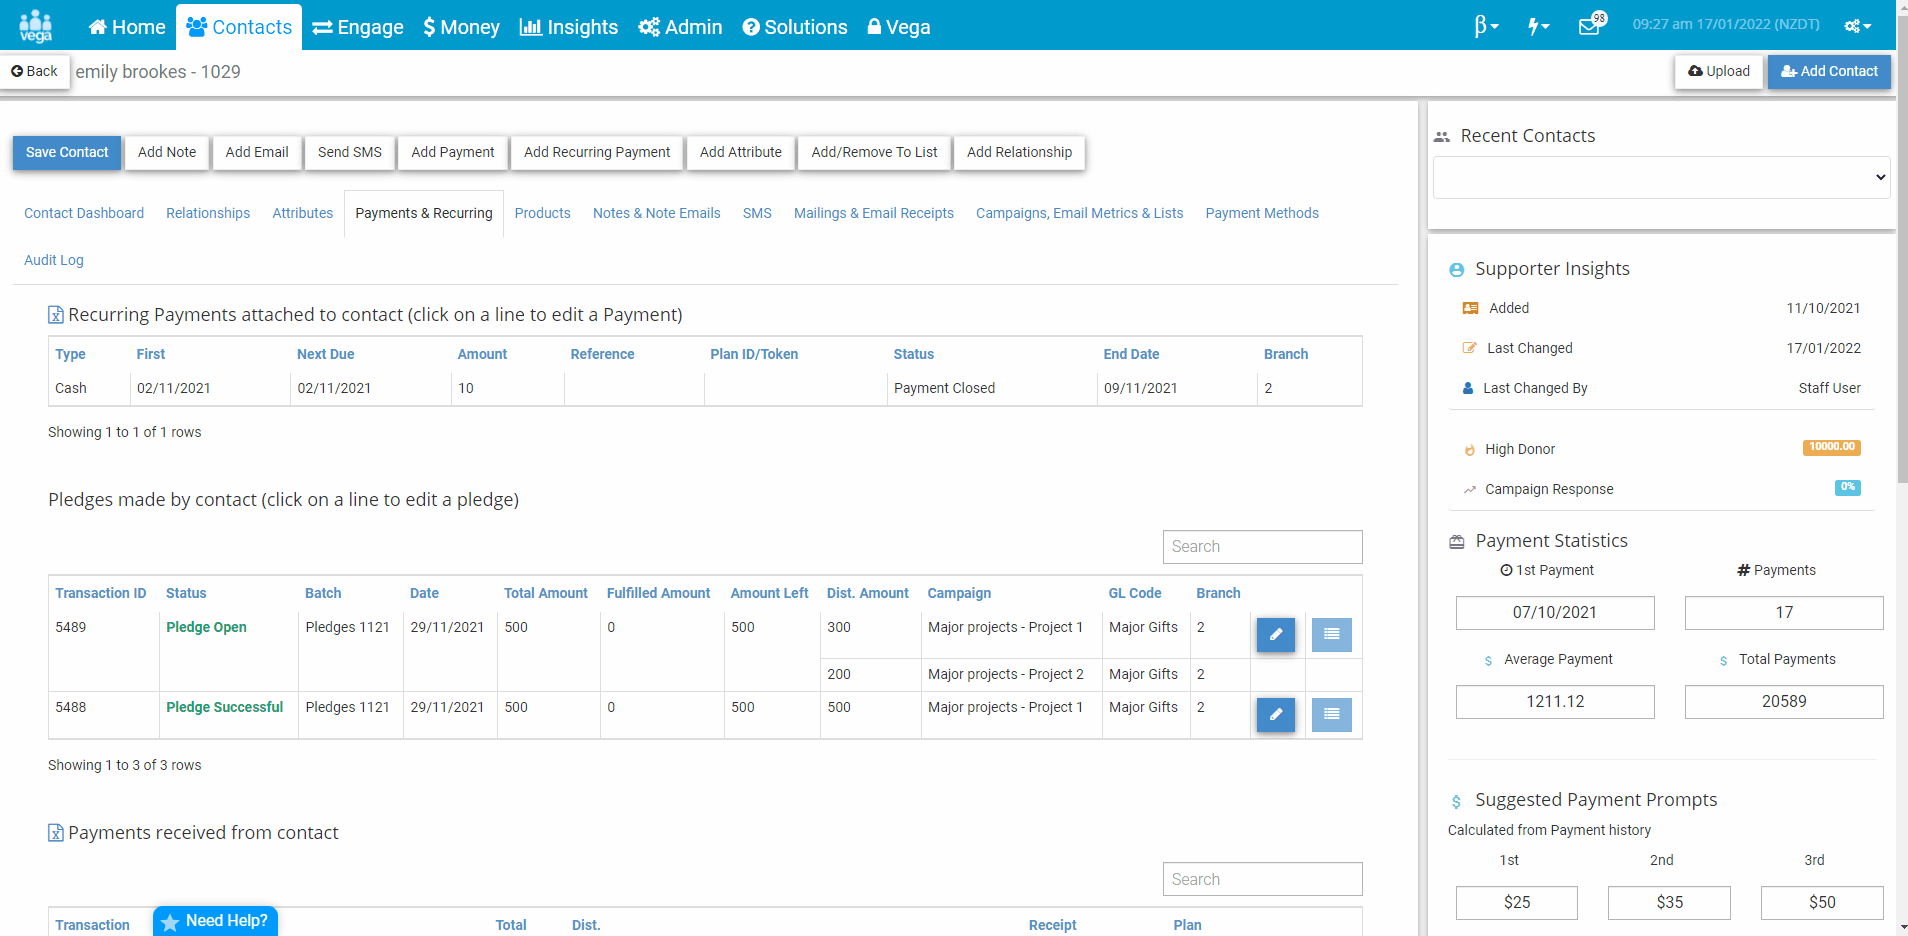
Viewing your pledge
After clicking save, your pledge will now be recorded on the Payments & Recurring tab of the contact, under the heading "Pledges made by contact".
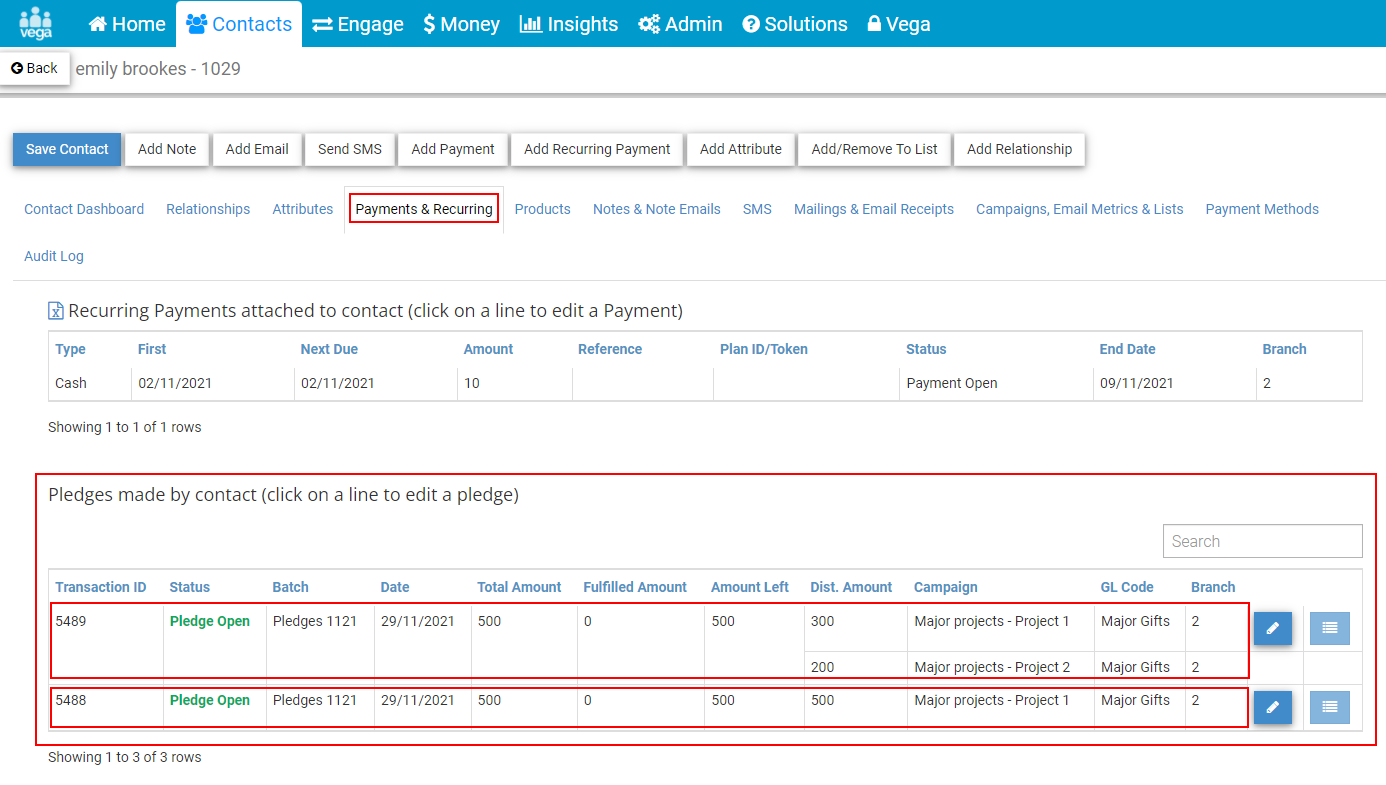 |
The above image shows the two pledge examples we added earlier, the top pledge with ID 5489 shows the two distributions recorded for the pledge.
The bottom pledge, ID 5488 shows the single distribution added.
This grid displays the total pledge amount, fulfilled amount, and the amount left so you can easily see the amount of income due to be paid for this contact.
Editing your pledge
The pledge details can be edited from here by clicking the pencil to the right of the row. It will open the payment form with the existing pledge details and some additional fields to show the amount fulfilled and left on the pledge and the receipt number if applicable.
 |
Your pledge can be edited to change the total amount, the distributions, the campaign, the GL Code, the receipt settings, or the status.
Changing the total amount field will update your payment form and either display additional money to be distributed if it was increased or show that two much has been distributed if it is decreased.
On the left-hand side of each distribution, you will see a bin icon, this can be clicked to remove the distribution from your pledge and allows you to redistribute the amount. This can be done if you need to change the campaign, GL code, or receipt settings of the distribution.
See the recording below of how the pledge with two distributions is edited to have the total amount distributed to one campaign and GL Code and the receipt settings added:
 |
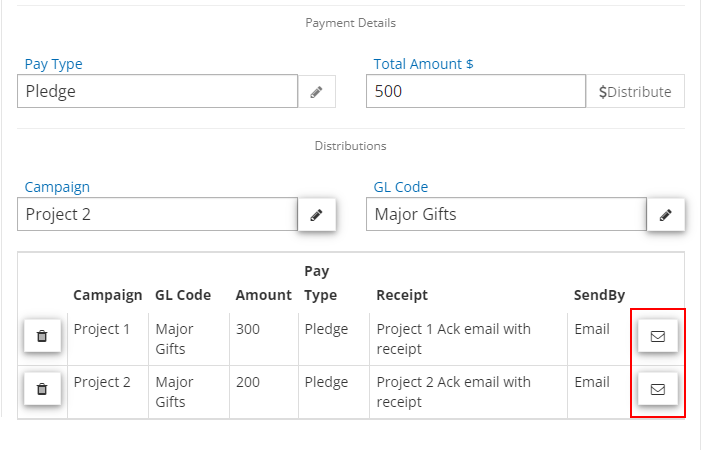
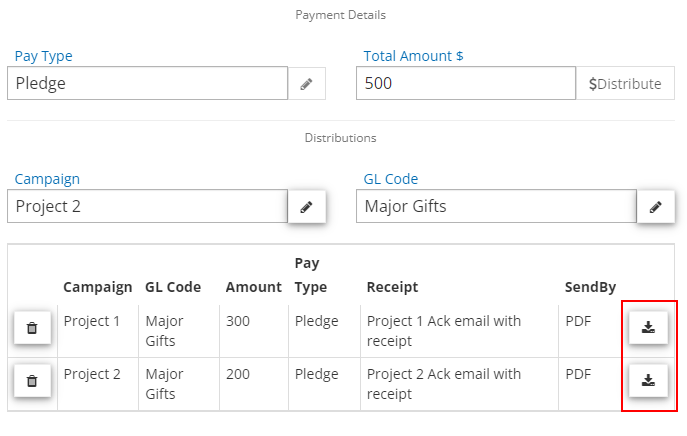
Acknowledging your pledge
If you're using the receipt field to issue an acknowledgment of the pledge, the document can be downloaded or emailed from here.
If your document was assigned to multiple distributions then the Email or Download button can be used in the distribution table to send or generate these documents:
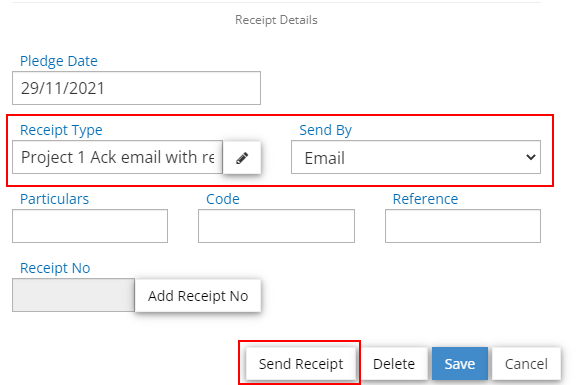
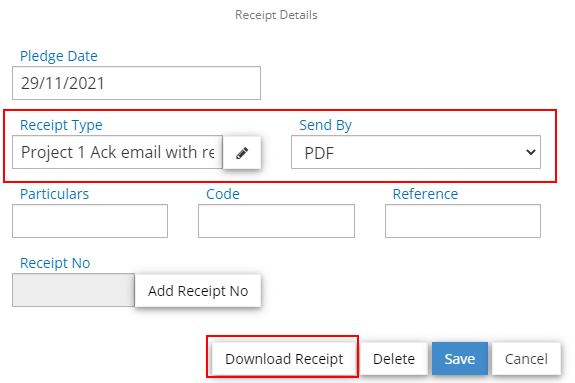
| Receipt by email | Receipt by PDF |
 |
 |
If your document has been assigned to the total pledge then the document will be displayed on the right-hand side under Receipt Details and there will be an option to Send Receipt or Download Receipt:
| Receipt by email | Receipt by PDF |
 |
 |
Reporting on pledges
You can report and track your pledge details with the following preset queries:
- Pledges – All
- Pledges – Declined
- Pledges – Open
- Pledges - Successful
Under Insights > Pledge Management, there are also Details and Summary reports available.
See the article here for detail on how to process a payment for your pledge.
Comments
0 comments
Please sign in to leave a comment.