There are a variety of ways to add payments to a contact. If you use the web widgets or the API then Vega will automatically process the donation, including receipting, de-duplicating and inserting the payment into the appropriate contact.
Alternatively, you can add payments directly on a contact, useful if you only have a single payment to add. Or you can use data import or Batch Entry to add many payments to multiple contacts, as explained below.
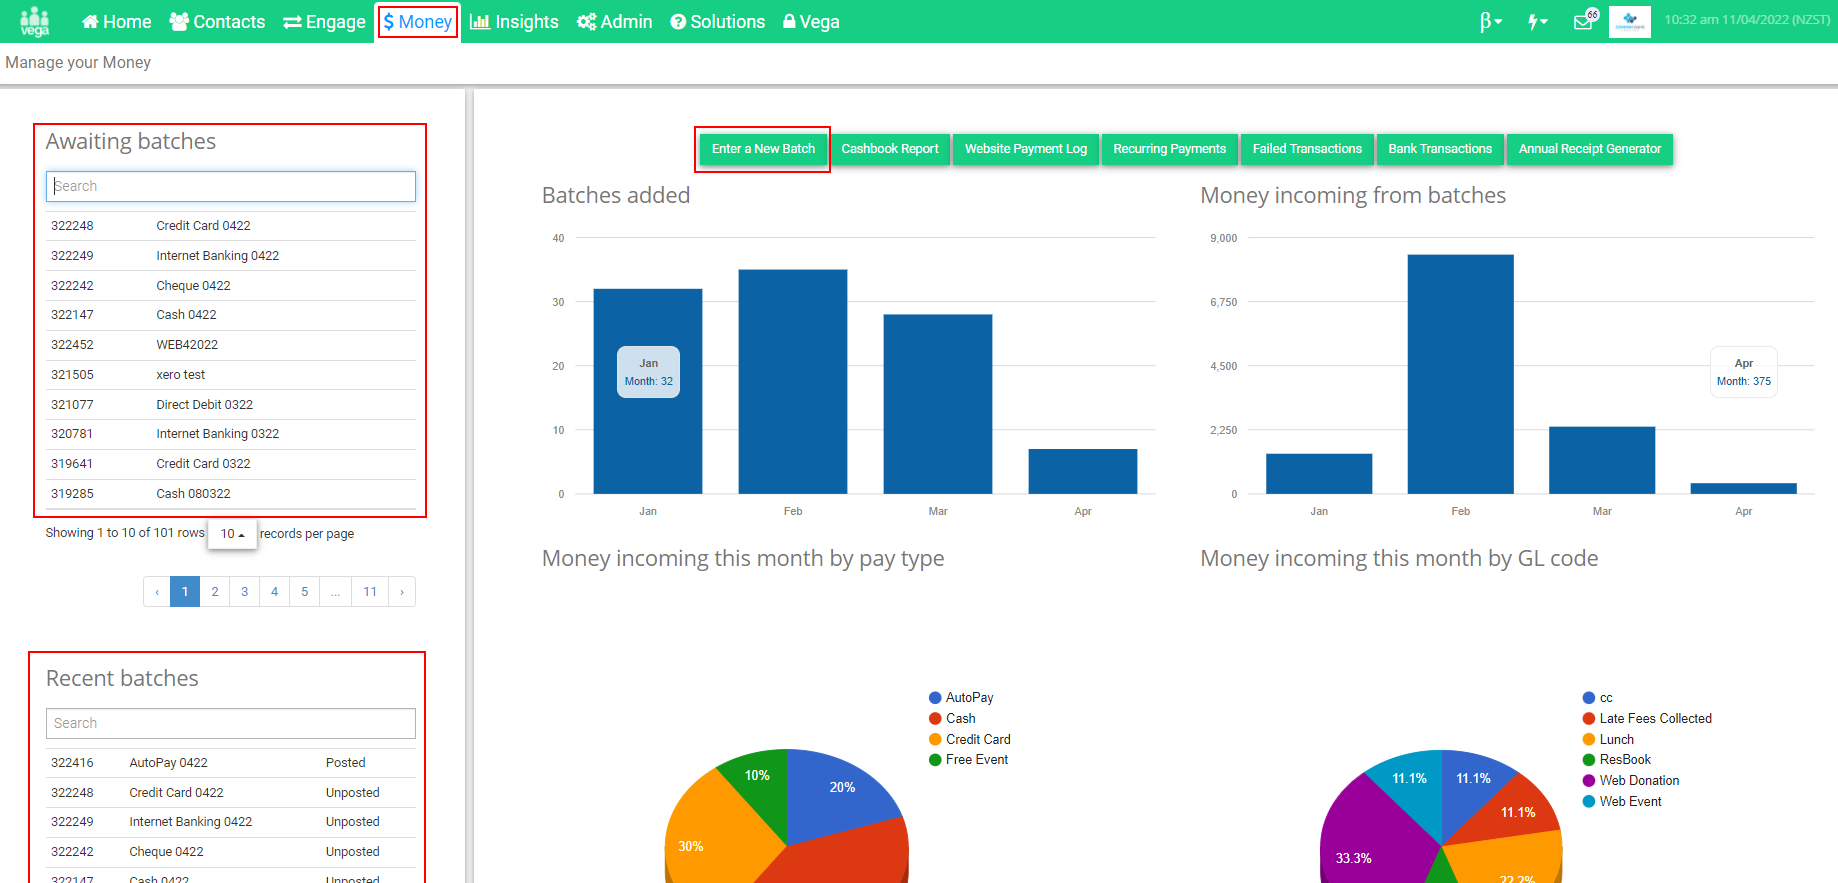
From Money, you can select an existing batch from the left-hand side or create a new batch. Awaiting batches will display your unposted batches and Recent batches will display batches of either status, posted or unposted that have been created recently.
For this example we will be creating a new batch by clicking the Enter a New Batch button:
 |
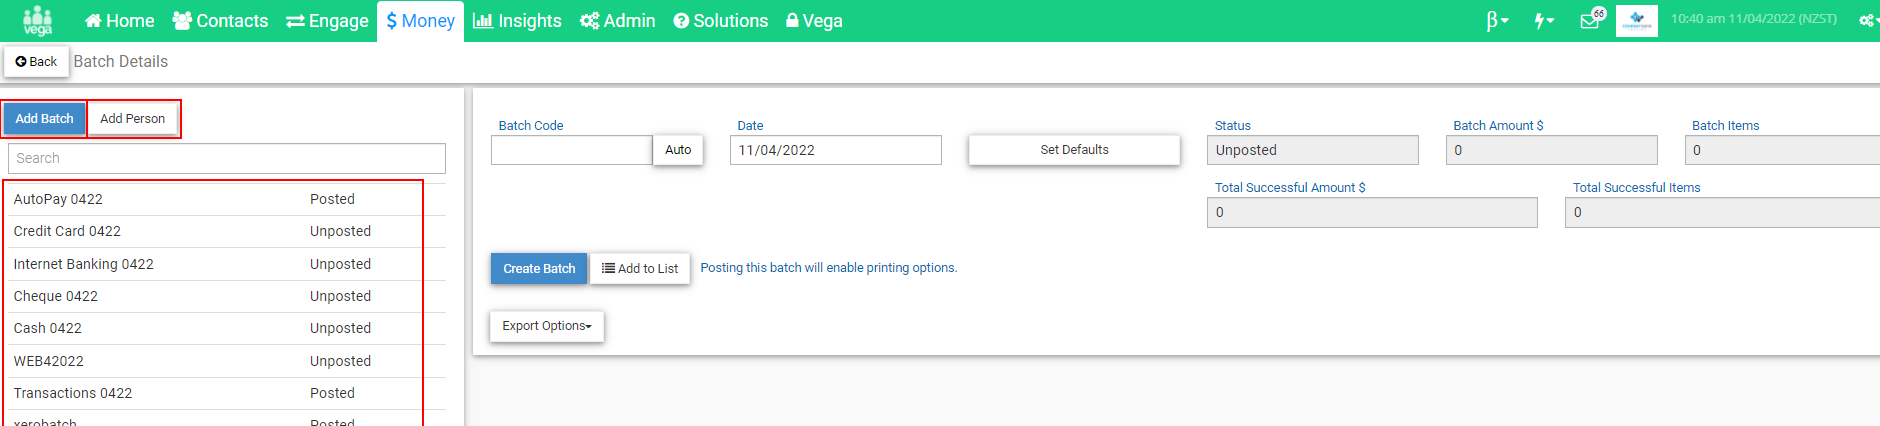
This will open the batch form, where you will still be able to access your recent batches on the left-hand side. If you select an existing batch but decide to create a new one the blue Add Batch button at the top left can be used at any point to open a new batch form. There is also an Add Person button to allow you to create a new contact from this screen.
 |
Creating a new batch
Every batch needs a Batch Code, this is the name of your batch. It is useful to have a consistent naming structure for your batches so it is clear to everyone in your organisation what the batch includes. This could be based on the payment dates or pay type included in the batch, the campaign of payments included or the user creating the batch, etc. There is an Auto button available that will generate a batch code, this will be the initials of the user branch, year, month, day, and user initials. For example code, HO20220411vS will be generated based on Head Office branch, 2022 year, 04 month, 11 day, and vS user.
The batch date will default to the current date but this can be edited if required.
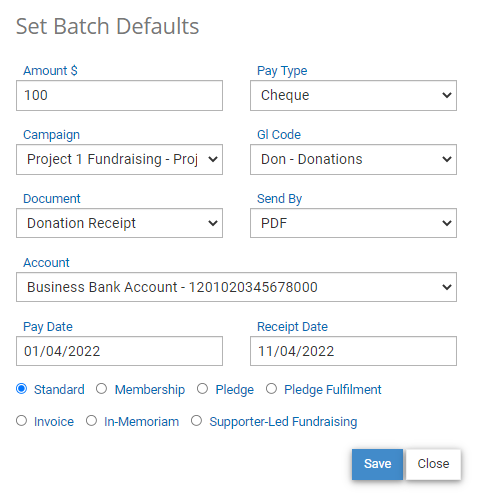
Set Defaults will open a pop-up window that allows you to set default values for the payments being entered. The details can still be changed, other than the bank account, for each payment but this can speed up processing by using the most common values and reduce errors by entering detail that will be the same for each payment, such as the campaign or GL Code.
Once your defaults have been set you can click Create Batch. This will save the new batch you have created and it will show on the left-hand side as an update to your recent batches.
 |
There will be additional buttons showing on your batch now, Add New Item is used to add the payments to your batch. This will open a pop-up window where you can search for the contact, using the vega ID, names, email, address, phone, etc. This will default to only show results of active contacts but you can tick the option to Search inactive contacts only if required. There is also the option here to Add New Contact.
When you select a contact from the returned results there is an option to Edit Contact, this will open the contact form and allow you to make any edits. After editing the contact or selecting the Add Batch Line option, any existing pledges or invoices will be displayed to select if the payment being added is to pay off one of these, otherwise, Add a New Payment can be selected.
 |
Any of the options detailed above will then open the payment form, this will look the same as when a payment is added directly onto a contact but any of your batch default settings entered will be auto-populated.
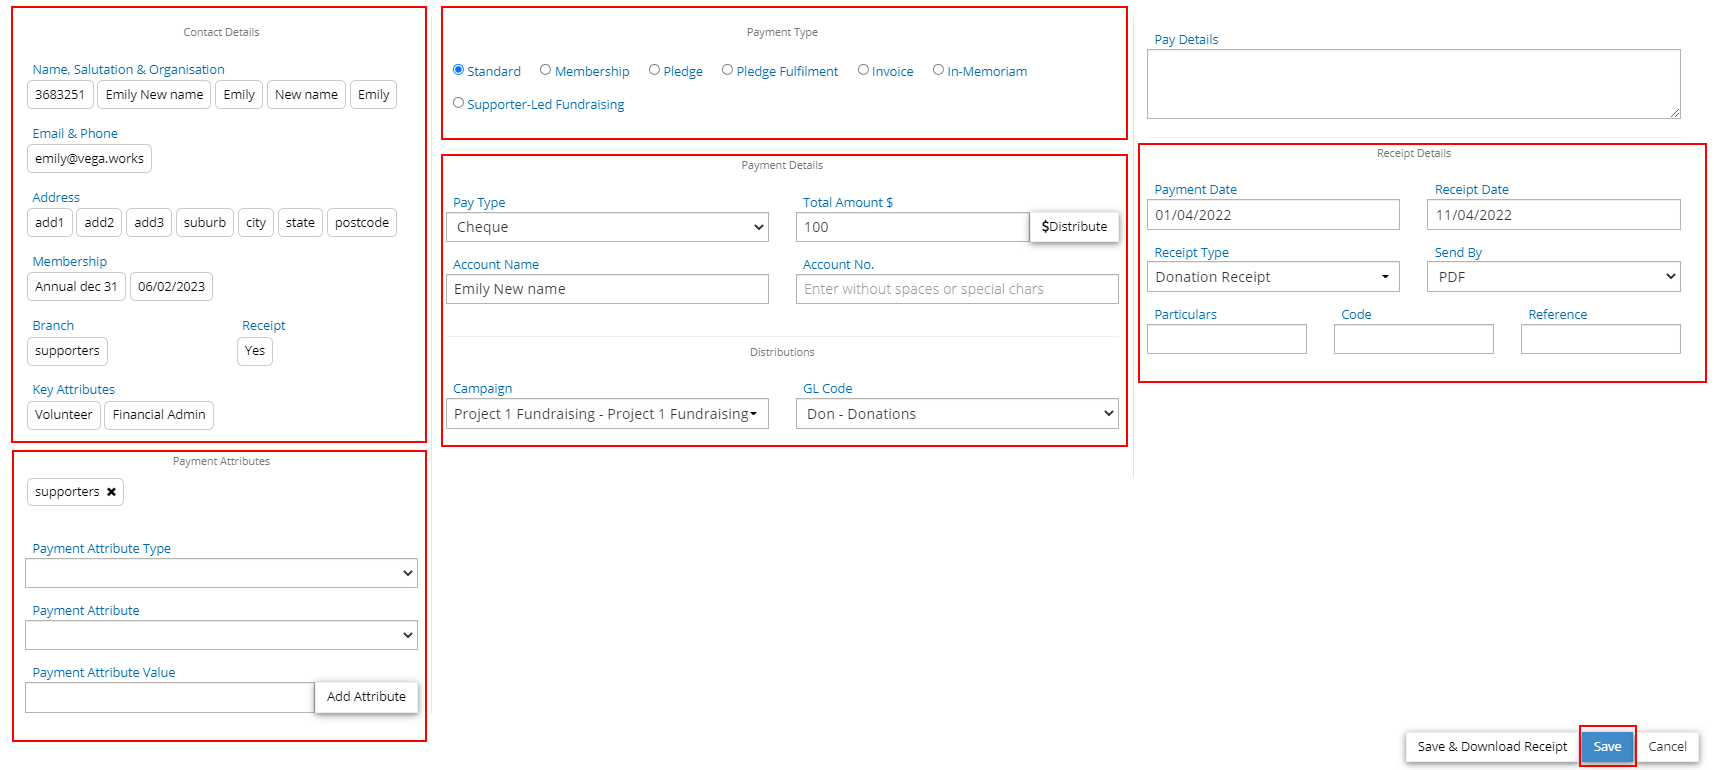 |
You will notice the payment form is divided into sections, as described below.
Contact Details
On the left-hand side, you will see important Contact Details:
- Vega ID, Account Name, Email, First Name, Last Name, Salutation, Organisation
- Home phone, work phone, mobile
- Address
- Membership
- Contact Branch, receipt option
- Key Attributes (if you have this turned on in your financial settings)
- Alert (if you have this turned on in your financial settings)
Payment Attributes
On the left-hand side at the bottom will be any Payment Attributes. You will automatically have the Contact Branch added here and drop-down lists to add any other applicable payment attributes and assign a value to these.
The middle section of this form is where the payment information is added:
Payment Type
We will be using the standard payment type but the linked articles below provide more detail on the specific payment types available.
- Standard: This is the default option for one-off payments. No further information is required.
- Membership: This option is available if memberships have been set up in vega. It allows for membership payments to be processed by selecting the membership type.
- Pledge: Pledge payments are for recording promised or pledged amounts to be paid at a later date.
- Pledge Fulfilment: This is used to record a payment against a pledge.
- Invoice: Like Pledges, invoices are not recorded as payments until the invoice has been paid but this does allow you to record that an invoice has been issued.
- In-Memorium: This allows for payments to be recorded in memory of another individual within vega. Details of in memoriam payments can be included in documents through the use of merge tags.
- Supporter-led Fundraising: This option will allow a payment to be recorded as fundraised by another contact in Vega and will also show on their payments.
Payment Details
- Pay Type- Cheque, Credit Card etc. Each of these different types will require different details to be completed as per the method of payment.
-
- If you have a payment gateway setup in vega, you can choose the credit card pay type to process payments directly through this screen.
-
- Total Amount- Add the total payment amount.
Distributions
This is where you have the option to split your total payment into different distributions to allocate funds to different campaigns and/or GL codes and issue a different document for each one. This can be used to split a payment between different projects, fundraising for different items, etc.
Adding a single distribution
If you are adding a payment to be allocated with the same financial and receipting details for the full amount then you can simply select the relevant Campaign and GL Code, choose your receipt settings on the right-hand side and click Save.
Adding multiple distributions
Alternatively, you can divide your total payment into multiple distributions. As an example, this can be used to record one transaction from a major donor who is donating to two projects.
Please note- A payment with multiple distributions will still be created as the same transaction ID and have the same receipt number.
Please see the recording below for how you can add multiple distributions to your payment:
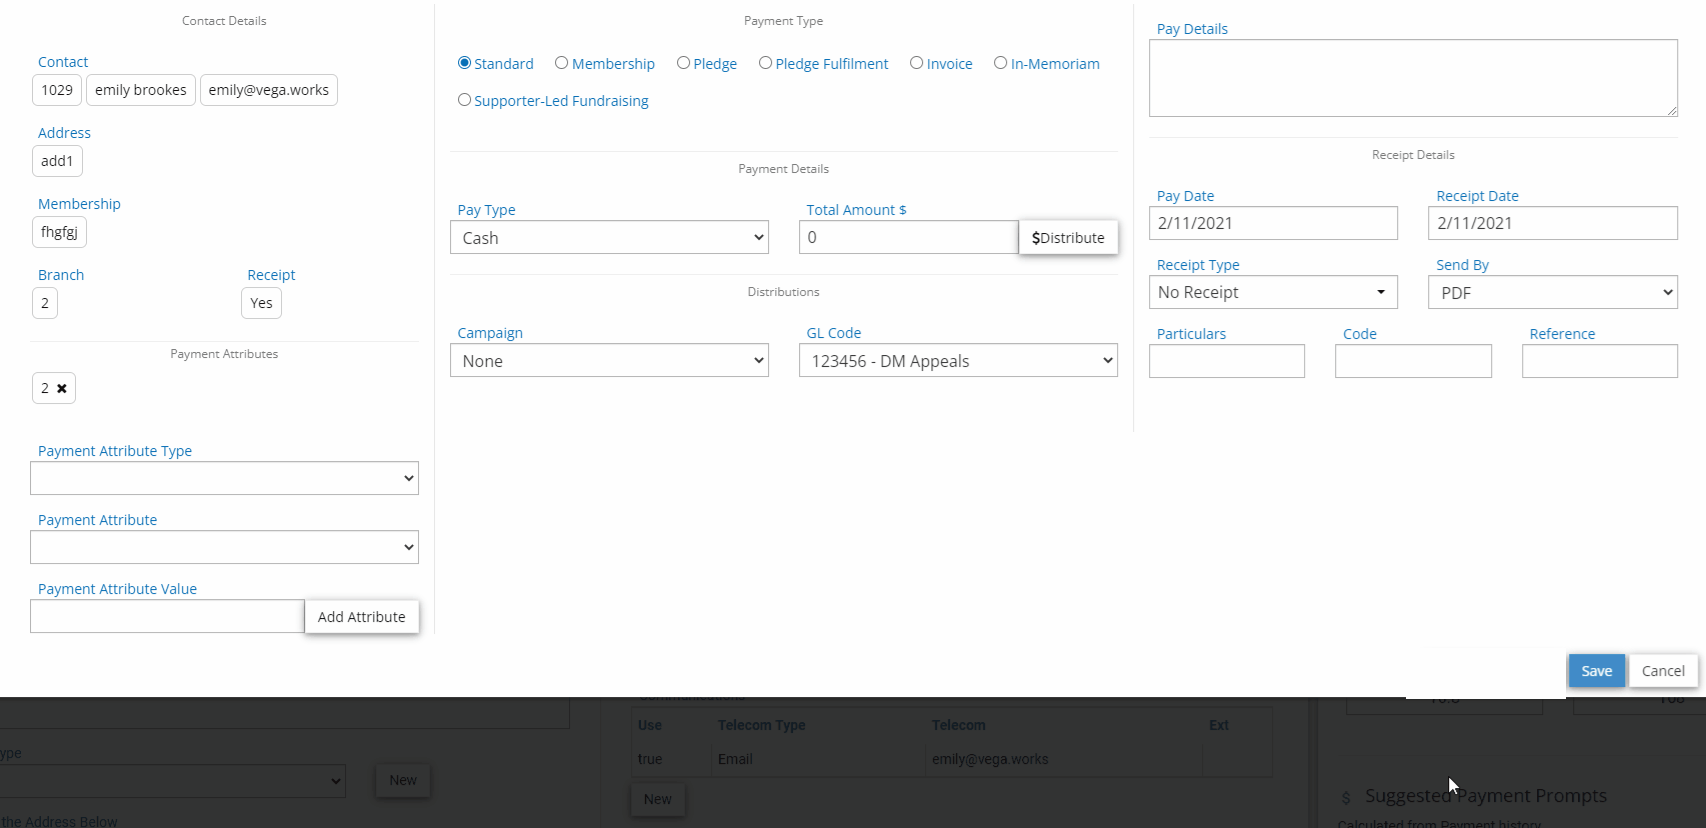 |
On the top right-hand side, we can record a note or comment related to the transaction in the Pay Details.
Receipt Details
- Pay Date- The date the transaction is made.
- Receipt Date- The date the transaction is receipted, usually today's date.
- Receipt Type- This is the document to be issued in acknowledgment of the total payment. The documents displayed in this dropdown can be customised in your Admin settings.
- Send By- This is the method used to send the receipt for the total payment:
- PDF: This is used to send a printed receipt and shows the option to Download Receipt, this will generate it as a PDF file.
- Email: This is used to automatically send the document via email to the preferred email address on the contact dashboard.
- If processing the payment through your payment gateway, save the payment before sending a receipt to ensure this has been a successful transaction.
- Particulars- Additional information on the payment.
- Code- Additional information on the payment.
- Reference- Additional information on the payment.
- Receipt No- This will be generated when the payment is saved, based on your receipt settings under Admin. There is the option to manually add a receipt number when one has not been generated or to Reset the receipt number once it has. These actions cannot be undone.
Click Save when you are happy that all information entered is correct for this payment.
This will display a pop-up asking if you would like to add another payment, clicking OK will open the contact search window to repeat the process for your next payment to be added to the batch, clicking Cancel will return you to your batch with the payment details now added shown in the batch.
The batch results will be updated and can be used to reconcile that the payments added match the expected amount and clearly shows any declined or pending payments included in the batch.
 |
When your batch is complete, click Post Batch to enable the output options for receipting.
Export options available are:
- Export to CSV
- Export to BNZ Direct Debit File
- Export Connected Recurring Payments
- Export Secure Pay File
Other Output options available once a batch is Posted are:
- Print Membership Report
- Print Bank List
- Print Summary
- Print Detailed Report Summary
- Receipt Stubs
- Labels For Batch
Comments
0 comments
Please sign in to leave a comment.